


Published May 6, 2026
For many yoga practitioners, the vinyasa flow is the heartbeat of their practice. It is a rhythmic, breath-led sequence that connects movement to consciousness. Yet, there is a specific, fleeting moment that often breaks the spell: the transition from Upward-Facing Dog (Urdhva Mukha Svanasana) to Downward-Facing Dog (Adho Mukha Svanasana).
In the heat of a fast-paced class, this transition can feel less like a fluid movement and more like a logistical hurdle. You are tasked with shifting from pressing into the tops of your feet with your toes pointed back, to tucking those toes and grounding the balls of your feet—all while maintaining core stability and shoulder alignment. If you’ve ever felt like you’re clumsily shuffling your feet or wondering if your technique is "correct," you are far from alone. This article explores the mechanics behind this transition and provides actionable strategies to transform your flow into a more graceful, supportive, and intentional experience.
The Mechanics of the "Clunky" Transition
The challenge lies in the radical shift of weight and structural engagement required by these two poses. In Upward-Facing Dog, your pelvis is dropped low, your chest is lifted, and the tops of your feet provide the foundation for a deep backbend. In Downward-Facing Dog, your hips are the highest point of the body, creating an inverted "V" shape that requires the balls of your feet to act as the primary anchors.
Moving from one to the other requires a rapid reorientation of the ankles, knees, and hips. When teachers move quickly through a vinyasa, students often resort to "autopilot," resulting in a rushed, disconnected movement that can strain the ankles or cause the lower back to crunch. Understanding that this transition is a pose in its own right—rather than just a "gap" between postures—is the first step toward refining your practice.
Chronology of the Flow: A Breakdown of the Movement
To master the transition, it is helpful to break the sequence down into its constituent parts. By slowing the movement, you can identify where the "clunkiness" originates.
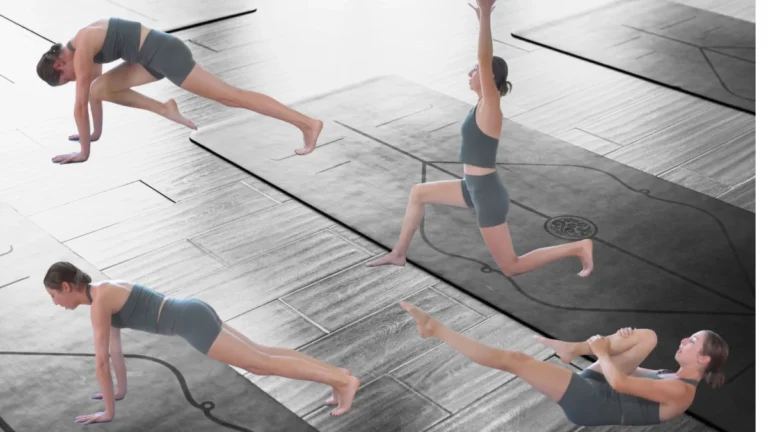
- The Initiation: You are in Chaturanga Dandasana (Four-Limbed Staff Pose) or moving into Upward-Facing Dog. The transition begins before you even leave the mat.
- The Pivot Point: This is the moment of greatest instability. As you lift your hips, the transition from the top of the foot to the ball of the foot occurs. This requires significant engagement of the tibialis anterior (the muscles at the front of the shin) to manage the foot’s flexion.
- The Integration: The final stage is the movement of the pelvis toward the ceiling, accompanied by the lengthening of the spine and the grounding of the heels toward the floor.
When this sequence is rushed, the "Pivot Point" is bypassed, leading to the stumbling sensation many practitioners describe.
Supporting Data: Why Your Feet and Ankles Matter
Recent physiological insights into yoga practice suggest that the feet are often the most overlooked part of the kinetic chain. The feet contain 26 bones and over 100 muscles, tendons, and ligaments. In yoga, they are not just points of contact; they are the foundation of your equilibrium.
If your ankles are tight—a common side effect of modern, sedentary lifestyles or repetitive footwear use—the "roll-over" required to move from Up Dog to Down Dog becomes significantly more difficult. Practitioners who spend time mobilizing the ankles through toe squats or focused stretching report significantly higher levels of comfort during transitions. Furthermore, the use of props, such as placing a block between the ankles, provides tactile feedback that forces the muscles to work in alignment, preventing the "splaying" of heels that often causes joint instability.
4 Expert-Approved Ways to Refine Your Transition
Whether you are in a studio class or practicing in your home sanctuary, experimenting with these four methods can help you find a version that feels supportive rather than strained.
1. The Knee-Down Modification
Often, the desire to "keep up" with the teacher forces us to skip the most supportive modifications. Bringing your knees to the mat between poses is not a sign of weakness; it is a tactical choice to reset your spine and shoulders.
- How to: Move from Upward Dog into a modified kneeling position. Tuck your toes while your knees are still on the ground, then press through your hands to lift your hips.
- The Benefit: This unloads the weight from your feet and arms, allowing you to transition with more control and less risk of "crashing" into the downward position.
2. The Asymmetrical Roll (One Foot at a Time)
Rolling over both feet at once can be overwhelming for the core. By breaking the movement into a staggered, one-foot-at-a-time transition, you allow your brain to map the movement more effectively.
- How to: From Up Dog, keep your hands grounded and lift your hips. Roll over the toes of one foot, establishing the ball of the foot on the mat, before repeating with the other.
- The Benefit: This creates a stable base and allows for better weight distribution. Remember to alternate your lead foot each round to maintain structural symmetry.
3. The Synchronized Roll (Both Feet at Once)
This is the "classic" yoga transition. It is the most aesthetically pleasing but requires the most strength in the core and ankles.
- How to: As you lift your hips, engage your core deeply and roll over both sets of toes simultaneously. Imagine you are drawing your ankles toward one another to keep your feet perfectly parallel.
- The Benefit: This builds immense strength and coordination. If you find your heels splaying, practice this at home with a yoga block held between your ankles to train the necessary muscle memory.
4. The "Tucked Toes" Upward Dog
Perhaps the most counterintuitive method is to keep your toes tucked during your Upward-Facing Dog entirely.
- How to: From Chaturanga, move into Upward Dog without ever pointing your toes. Simply keep them tucked the entire time.
- The Benefit: This eliminates the need to roll over your feet mid-flow. While this changes the nature of the backbend (it can feel more intense on the lower back), it creates a seamless, efficient path to Downward Dog. You can mitigate the intensity by keeping your elbows slightly bent or not dropping the pelvis as low.
Official Perspectives: The Teacher’s Role
Senior yoga instructors emphasize that the goal of a vinyasa flow is not to replicate a picture-perfect pose, but to maintain the integrity of the breath. "When a student loses their breath, they have lost the yoga," notes one leading practitioner. "If the transition from Up Dog to Down Dog causes you to gasp or hold your breath, you are moving too fast for your current capacity."
Official guidance from yoga organizations often stresses that there is no single "right" way to transition. The body’s anatomy—specifically the length of the femur and the flexibility of the ankle—varies from person to person. What feels "right" for a professional athlete may feel restrictive for a desk worker. Teachers are encouraged to offer these four variations regularly, empowering students to listen to their own physiological cues.
Implications: Moving Beyond the Mat
The struggle with the transition between Upward-Facing Dog and Downward-Facing Dog is a perfect metaphor for our lives off the mat. We often rush through the "in-between" moments—the transitions between jobs, relationships, or life stages—hoping to reach the next "pose" or destination as quickly as possible.
When we stumble in these transitions, we are prone to self-criticism. However, by slowing down, noticing where we feel "clunky," and experimenting with new ways to move, we learn a valuable lesson: the transition is the work.
By intentionally choosing a modification that supports your body today, you are not just making your yoga practice smoother; you are cultivating a mindset of self-compassion and adaptability. Next time you find yourself stumbling through a vinyasa, take a breath. Ask yourself what you need in this moment. Do you need to slow down? Do you need to modify? The mat is a laboratory for life—use it to discover how to make the uncomfortable parts of your journey feel, at the very least, a little more workable.
Final Thoughts for the Practitioner
As you continue your practice, remember that consistency beats intensity. You do not need to master all four of these transitions overnight. Pick one that feels the most "accessible" to you, and commit to practicing it for the next week. Notice the change in your breathing, the change in your shoulder tension, and the change in your overall relationship with the flow. Yoga is a lifelong exploration; there is no need to rush to the finish line.