










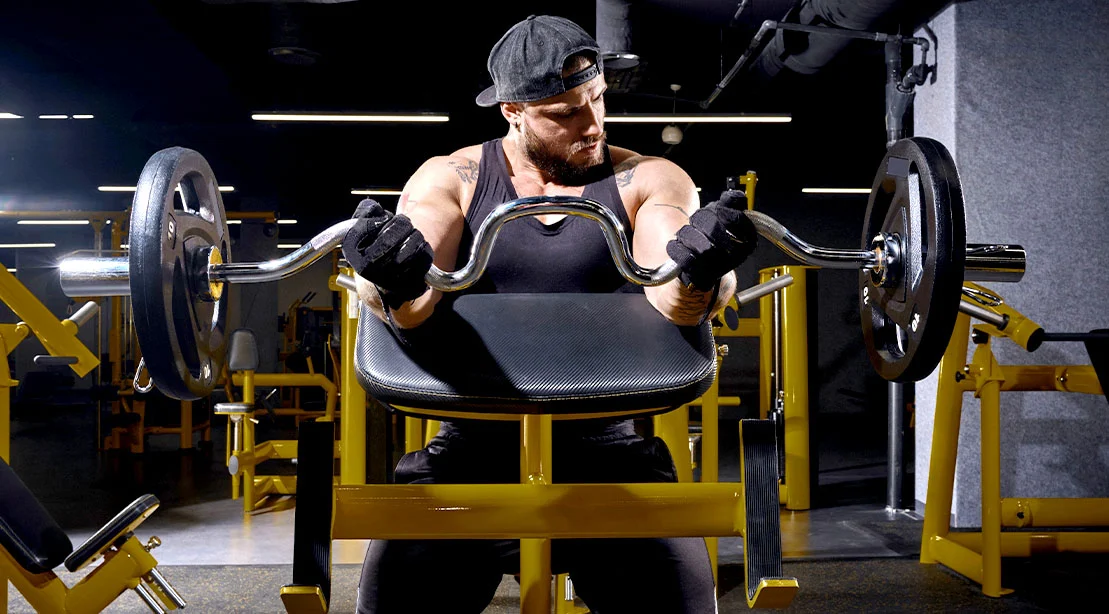
The preacher curl is widely regarded as the gold standard for biceps isolation. By locking the upper arms into a fixed position against a padded surface, the exercise effectively neutralizes the momentum often generated by the shoulders and back, forcing the biceps to shoulder the entire load. However, the movement is frequently misunderstood and poorly executed in gyms worldwide. The difference between a mediocre set and a transformative one lies not in the weight on the bar, but in the precision of the setup.
To truly optimize biceps development, one must treat the preacher curl less like a generic lift and more like a surgical procedure. This guide breaks down the science, the methodology, and the meticulous checklist required to turn the preacher curl into your most effective tool for arm growth.
The Core Fundamentals: Why Setup Is Everything
The primary objective of the preacher curl is to maximize "flex time"—the duration during which the biceps are under active, controlled tension. When performed correctly, the preacher curl minimizes the contribution of the anterior deltoids and prevents the recruitment of the torso, isolating the long and short heads of the biceps brachii.
Whether you are utilizing an EZ-curl bar, a straight Olympic bar, or a specialized preacher machine, the mechanical principles remain constant. The setup is the "green light" for the movement; if your body is not aligned, the neural drive to the biceps is compromised, and the risk of elbow strain increases significantly.
Chronology of an Elite Setup: A Six-Step Protocol
Achieving professional-grade isolation requires a systematic approach. By following this sequence, you ensure that every repetition is primed for maximum mechanical advantage.
Step 1: Calibrating the Seat and Pad Height
The most common error in the gym is failing to adjust the equipment to your specific limb length. If the seat is too low, you will struggle to reach the bar; if it is too high, your shoulders will round forward, placing unnecessary stress on the joints.
- Internal Cue: Visualize your upper arms as being "glued" to the pad.
- External Cue: Ensure your armpits are nestled firmly against the top edge of the preacher pad.
- Coach’s Tip: Before engaging the load, extend your arms fully and perform a light isometric contraction. If your upper arms remain stationary throughout the range of motion, you have found your optimal height.
Step 2: Establishing a Foundation of Stability
A kinetic chain is only as strong as its base. If your lower body is shifting or your feet are dancing, you are leaking energy. A rock-solid base of support is required to prevent the lower body from compensating for the fatigue of the biceps.
- Internal Cue: Maintain stability from the ground up.
- External Cue: Drive your feet aggressively into the floor throughout the entire set.
- Coach’s Tip: If you notice your hips rising or your legs shifting, the weight is too heavy. The stability of your base dictates the intensity you can safely apply to the muscles.
Step 3: Optimizing Grip and Hand Placement
Your grip dictates the path of the bar and the distribution of stress on the forearms and elbows. A common mistake is a "lazy" grip that allows the bar to control the wrist.
- Internal Cue: "Crush" the handle to maximize neural drive.
- External Cue: Attempt to "pull the bar apart" as you curl.
- Coach’s Tip: This external cue of pulling the bar apart increases tension in the lateral chain and helps stabilize the elbow joint, preventing the "wobble" that often leads to tendonitis.
Step 4: Managing Shoulder and Elbow Alignment
The shoulders and elbows are the hinges of this movement. When the shoulders remain packed and the elbows stay fixed, the biceps are placed in the most advantageous position to exert force.

- Internal Cue: "Elbows stay home."
- External Cue: Pin your triceps firmly into the pad.
- Coach’s Tip: If your elbows begin to "travel" or lift off the pad during the eccentric (lowering) phase, you are losing the battle against gravity. Reduce the load to maintain structural integrity.
Step 5: Pre-Tensioning the Muscle
The bottom position of the preacher curl is the "danger zone." Many lifters relax here, effectively turning off their muscles and relying on their joints to hold the weight. This is a recipe for injury.
- Internal Cue: "Load the biceps before the movement begins."
- External Cue: Remove all "slack" from the bar.
- Coach’s Tip: Before the first rep, apply a small amount of upward force to the bar—without actually lifting it. This "pre-load" signals the motor units to fire immediately.
Step 6: Head and Neck Posture
The head dictates the posture of the spine. If you crane your neck forward to watch the bar, you inevitably round your shoulders, which inhibits the biceps’ ability to contract fully.
- Internal Cue: "Long neck, relaxed jaw."
- External Cue: Fix your gaze straight ahead at a neutral point.
- Coach’s Tip: If your head begins to dip or move as you fatigue, you have reached technical failure. Stop the set to maintain the integrity of your posture.
Supporting Data: Why Isolation Outperforms Momentum
Scientific literature in kinesiology consistently highlights the "length-tension relationship" of the biceps. By placing the arm in front of the body (the preacher position), the long head of the biceps is placed in a stretched position, which theoretically allows for greater force production during the initial phase of the curl.
According to sports physiologists, the reduction of "cheating" movements (such as back arching) ensures that the mechanical work is performed by the target tissue. When the biceps are isolated, the recruitment of motor units increases significantly, leading to greater metabolic stress—a primary driver of muscle hypertrophy.
Addressing Common Form Mistakes: Expert Responses
Even experienced lifters fall victim to small technical drifts. Here is how to troubleshoot the most frequent errors:
- The "Hitchhiker" Elbows: When the elbows lift, the anterior deltoid takes over the load.
- Correction: Lower the weight. The ego is the enemy of the isolation exercise.
- The Shoulder Roll: Rolling the shoulders forward to "finish" the rep removes tension from the biceps.
- Correction: Imagine your elbows are fixed door hinges; they do not pivot.
- The "Dead Stop" Relaxation: Relaxing at the bottom of the movement removes the protective tension from the elbow joint.
- Correction: Keep the biceps slightly contracted even at the very bottom of the rep.
Implications for Your Training Program
The preacher curl should not be viewed as a "finisher" to be performed with sloppy form at the end of a workout. Its true value lies in its ability to build foundational strength and muscle maturity in the upper arms.
By implementing this six-step setup checklist, you transform the preacher curl from a dangerous, momentum-driven movement into a precision instrument. The result is not just larger biceps, but a more resilient elbow structure and a more sophisticated understanding of muscle isolation.
As with any high-intensity training, consistency is paramount. Once this setup becomes second nature, you will find that you can stimulate more growth with less weight, effectively extending your training longevity and maximizing your progress toward your aesthetic goals. Master the setup, ignore the urge to move heavy weight with bad form, and your biceps will have no choice but to grow.